Administration
- MNET public key
- Login Page Instructions
- Front Page Course
- Gmail with Moodle for Outgoing Email (SMTP)
- Update Frontpage Summary
- Cache Administration
- Server Environment Checks
- Language Pack Cache
- Run a scheduled task immediately
- Scheduled Tasks: A lock was created but not released
- Replacing strings in the database
- Resetting a User's Password
- Email Settings on Test and Development
- Extended Characters in Usernames
- Verify your Moodle Database Schema
- Maintenance Mode
- Environment Requirements
- Site administration search page
- Site Configuration
- Useful URL Shortcuts
- Hide My Profile Forum Posts
- Time Zones
- Hide My Profile Messages
- Showing additional fields on user profile page
- Add Site Admins through cfg.php tool
- Search Engine Indexing
- Uninstall Missing Plugins
- HTTPS Conversion Tool
- Mailtrap.io SMTP settings
MNET public key
All MNET host keys are stored in the table: mdl_mnet_host.
The id of the local MNET host key (your moodle) is stored in the config table in the mnet_localhost_id value.
You can use the following to get the puglic key and MNET information about your local moodle. Also a good idea to back this up if it is a site with an MNET integration (e.g. Mahara) as it will break once the public key changes.
select * from mdl_mnet_host where id = (
    select value from mdl_config
    where name = 'mnet_localhost_id'
);
Login Page Instructions
The instructions that appear on the Moodle login page are stored in the Moodle configuration property auth_instructions. You can edit them from:
In the database, look for auth_instructions in the mdl_config table and change the value (which can be HTML):
select * from mdl_config where name = 'auth_instructions'
You may need to purge your Moodle cache to see changes.
Front Page Course
The moodle front page is actually a course has the reserved course ID of 1. So you can update things like the site full name, shortname, and summary by updating this course in the mdl_course table in the database.
Gmail with Moodle for Outgoing Email (SMTP)
You can use Gmail (including Google Workspace) to send emails via Moodle. Here are the settings required:
In your Google account:
- Login with the relevant account to https://accounts.google.com
- On the left go to security
- You should already have 2FA (2 Step Verification) enabled but if not, enable 2FA first otherwise you won't have the ability to set up app passwords
- Select App passwords
- Add a new one, select app Mail and select device as "Other". A good name might be Moodle or the name or your Moodle instance.
- The generated password is the one you use for the
SMTP passwordfield.
In Moodle as a site administrator:
- SMTP hosts: This requires both the server address and port (587 for TLS):
smtp.gmail.com:587 - SMTP security:
TLS - SMTP Auth Type:
LOGIN - SMTP username:
your@emailaddress.com - SMTP password:
your app password(not your actual password)
Further down you also need to change the No-reply address to the same email address as your SMTP username email address.
Update Frontpage Summary
You might have the need to update the Moodle front page summary through the database rather than through the UI. For example you might get an error editing the summary after a clone, or you might want to script the cloning process and change the frontpage text through the database.
Here are the steps:
- Update the moodle course sections summary field for the relevant course and summary (you might need to find these first) for your frontpage. The course ID is more than likely
1for your frontpage, but you’ll need to confirm this. You can find the section id by looking at the URL that is used to edit the section (e.g.https://<yoursite.com>/course/editsection.php?id=xxx).
update mdl_course_sections
set summary = 'Your text/HTML'
where course = x
and section = y;
You’ll probably find that even after you purge the moodle cache this doesn’t take effect. You’ll need to also clear your course section cache with the following SQL (note this largely applies to older versions of Moodle < 3.2).
update mdl_course set sectioncache = ''
where id = x;
Cache Administration
You can now manage all Moodle caches from Cache Administration navigation:
Or simply append /cache/admin.php to your base URL.
This page is very handy if you are using a separate caching system like Memcache(d) or Redis.
You can also purge, file, static request and sessions caches here, and look at all the known cache definitions.
For lots more information about how this all works, see the Caching documentation page.
Server Environment Checks
The server environment page is a really useful page for checking the health of your server software and database. It can be accessed through:
Or you can add /admin/environment.php to your base URL.
It will confirm that your database and PHP version is correct for the given Moodle version and that all expected PHP settings and extensions are enabled. It will also tell if you need to do anything to your database e.g. Antelope to Barracuda conversion, or utf8 to utf8mb4 conversion.
Also, you can a moodle version e.g. 3.5 upwards if you are on Moodle 3.4.x and determine if the Moodle upgrade will require any underlying server changes e.g. PHP/database version upgrades.
An important step when planning your upgrade process.
Language Pack Cache
You can purge the language pack cache through the Cache Administration page. Simply find the Language string cache definition and then select purge.

This is very handy if you make any language customisations as these are cached and require a cache purge to see.
Also, if your language customisations aren't taking efect:
- Language pack strings are usually single (
') quoted. So if you use one of these in your customised text, it will actually throw an error but not necessarly tell you. Use double quotes (") or if possible nothing at all. - Check for any strange characters in your customisation text e.g. don't use a rich editor like Microsoft Word, make sure you are pasting plain text.
Run a scheduled task immediately
To run a scheduled task immediately, navigate to:
Edit the relevant task and adjust the Minute / Hour to * so that the Next run changes to ASAP.
When the cron is next run the scheduled task will also be run. You might also need to manually trigger the cron depending on how that is set up.
Scheduled Tasks: A lock was created but not released
Schedule tasks can use two types of locks:
- Database locks —
lock_dbtable - File locks —
dirroot/lockin the moodle data directory/file store
The follow error can occur when running a cron through the CLI for example:
!!! Coding error detected, it must be fixed by a programmer: A lock was created but not released at:
[dirroot]/lib/classes/task/manager.php on line 483

 Code should look like:

 $factory = \core\lock\lock_config::get_lock_factory('type');
 $lock = $factory->get_lock(Resource id #585);
 $lock->release();  // Locks must ALWAYS be released like this.
As a starting point, trying disabling the schedule task causing the error and see if you can get the cron to run successfully.
You can try clearing out the locks as well from the database/filestore (whichever is relevant) and running the cron again.
Replacing strings in the database
There is a tool provided with Moodle to replace strings in your database with another value. This is very useful for things such as site address or domain name changes, and changes from non-SSL (http) to SSL (https).
The tool can be accessed via the following relative URL as a site administrator:
/admin/tool/replace/
While you can certainly run it from the browser site, it can timeout and cause problems to do so. Therefore the CLI version is a far better option and available in the moodle code tree under: /admin/tool/replace/cli/
php admin/tool/replace/cli/replace.php

Search and replace text throughout the whole database.

Options:
--search=STRING       String to search for.
--replace=STRING      String to replace with.
--shorten             Shorten result if necessary.
--non-interactive     Perform the replacement without confirming.
-h, --help            Print out this help.
So lets say you change your site from http://yoursite.com to https://yoursite.com you could run it like so:
php admin/tool/replace/cli/replace.php
--search=http://yoursite.com --replace=https://yoursite.com  --non-interactive
This will scan through tables and give you results in the console as it is going. The non-interactive flag prevents prompting (assuming you are comfortable with the change). If you aren’t you probably shouldn’t use the tool or at least use it on a test site first. The shorten result flag shouldn’t be necessary in most cases.
Resetting a User's Password
If you have access to the Moodle application server, you can use the admin/cli/reset_password.php command to reset passwords for users with the manual authentication method.
To run this script (from the moodle root code directory), you may need to sudo as a user with write privileges to the $CFG->dataroot directory.
php admin/cli/reset_password.php

== Password reset ==
Enter username (manual authentication only)
: moodlewiki
Enter new password
: moodlewiki
For example the above password moodlewiki would not be secure enough and by default would throw this error:
Very handy if you are unable to get into the Moodle site for any reason, or need a quick way to reset a user’s password.
Email Settings on Test and Development
There are a number of settings provided by Moodle for test and development environments specifically to avoid issues around sending emails to users from a non-Production site which is never a good look! This is a common trap for environments that are refreshed from producton, particularly when running cron/scheduled tasks
Firstly there is the all or nothing setting. If set, no emails will ever be sent.
$CFG->noemailever = true;
Secondly there is the combination of the $CFG->divertallemailsto and $CFG->divertallemailsexcept settings which will divert all emails to a specified address, unless they are on the exception list which can be defined with a regular expression (regex):
Here's a simple example:
$CFG->divertallemailsto = 'noreply@moodlewiki.com';
$CFG->divertallemailsexcept = '[A-Za-z0-9._%+-]+@moodlewiki.com';
This will divert all emails to noreply@moodlewiki.com unless they match the address @moodlewiki.com in which case it will send them as normal.
You can see this in action with the following RegExr demo.
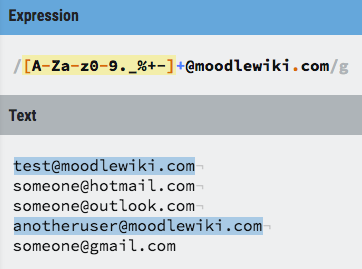
Notice how the Regex only matches @moodlewiki.com addresses and ignores the others? Only matches to the regex will get emails, all others are diverted to the catch all address.
So make sure all your non-production environments have both the $CFG->divertallemailsto and $CFG->divertallemailsexcept settings in place in their configuration files. This is probably the simplest and most reliable way to prevent emails being sent by accident through Moodle as it doesn't require any database updates, hacks, or 3rd party plugins.
Extended Characters in Usernames
If you need to use extended characters in usernames, there is a setting under:
Called Allow extended characters in usernames (extendedusernamechars).
You don’t need this if you are using email addresses as usernames (as the @ symbol is allowed) but you might run into a few other edge cases with email addresses:
Emails that are mixed case e.g.
- Example@MoodleTips.com need to be lowercased to example@moodletips.com
- Emails can have other characters such as an apostrophe (e.g. jack.o’brien@example.com) and if you want to preserve such characters you’ll need to turn this setting on. Alternatively you can remove such characters from the username.
- Emails might have extended language characters in them which required this setting to be turned on as well if you want to match the username to the email addresse exactly.
Also worth noting is that the lib/classes/user.php definition uses PARAM_USERNAME (not PARAM_RAW) anymore in recent versions of moodle. This is used for things like the core user web services. So you will hit invalid parameter exceptions if you specify a username in say mixed case format or with extended characters (and the extendedusernamechars setting is off).
This can be confusing it seems like you have specified the wrong parameters but what’s happening is that your parameter does not meet the requirements of PARAM_USERNAME. To see the code used to test PARAM_USERNAME have a look in lib/moodlelib.php :: clean_param().
Verify your Moodle Database Schema
There is a very handy CLI tool admin/cli/check_database_schema.php which compares the structure of your Moodle database against the XMLDB metadata in the code and looks for any issues.
These might includes issues such as:
- Missing tables – they exist in XMLDB but not in your DB (not good!)
- Unexpected tables – tables in your database not defined in XMLDB (e.g. created outside of Moodle)
- Mismatches between table column definitions in the database and XMLDB
Some things may be acceptable to ignore, but it pays to do a check, particularly after an upgrade to make sure the upgrade process worked correctly and that you aren’t missing any core or plugin database tables that are defined in XMLDB, as these will pop up as database errors in your application sooner or later (e.g. Error reading from database).
If you need to build any missing core tables, remember they are defined under:
From here find lib/db (core database tables) and choose Load, followed by Edit. Find the table you need and choose Edit. You can then use View SQL code to get the relevant SQL commands to create the table if it is missing from your database.
Maintenance Mode
You can enable site maintenance mode through:
Site administration > Server > Maintenance Mode > Maintenance mode
This disables access to the site to all users except site administrators. This is fine for minor updates and patching, but for large upgrades where you intend to take a backup of the site, you should be using CLI maintenance mode.
This can be found under the standard admin CLI location:
php admin/cli/maintenance.php
Options include:
php admin/cli/maintenance.php --enable
php admin/cli/maintenance.php --disable
The message displayed will be the same maintenance mode message set up under:
Behind the scenes, because CLI maintenance mode needs to work without database connectivity, it places a file called climaintenance.html in the data directory. This is a simple HTML web page that displays the maintenance mode message. So you can also just edit the text in this file if you want to adjust the maintenance mode message after it is enable (e.g. if you have an ETA and that has changed).
There is also a cool feature to enable it later e.g.
php admin/cli/maintenance.php --enablelater=60
Which would enable it after 60 minutes. This will tell exactly when maintenance mode will be enabled too. Good for making sure the site is in maintenance mode when you are ready to start an upgrade for example.
Environment Requirements
Moodle environment requirements are defined in the file admin/environment.xml.
For each major Moodle version this defines things like:
- Minimum database versions for each platform (MySQL, MariaDB, PostGreSQL, Microsoft SQL Server or Oracle)
- Minimum PHP version
- Required and optional PHP extensions (e.g.
curl,openssl,mbstringetc) including the plugins that might require them. - Required and optional PHP settings (e.g.
memory_limit,file_uploads,opcache.enableetc) - Any custom checks usually defined in
lib/upgradelib.phpsuch ascheck_database_storage_engineandcheck_database_tables_row_format
These are the checks you see when you perform an install or upgrade and are available in the server environment page under:
As this file is in the git repository, you can query its log in the master branch to see the latest updates to the file i.e.
(master)$ git log admin/environment.xml
Site administration search page
The site administration search page is fantastic as it lets you find the plethora of site configuration options with a key word search.
Usually its included in the Site administration block but you can also access it directly with the URL:
https:{yoursite.com}/admin/search.php
Sometimes its just easier to append admin/search.php to your URL.
Site Configuration
There's a handy CLI tool available in recent versions of Moodle to get and set site and plugin/component configuration:
php admin/cli/cfg.php --help
Displays the current value of the given site setting. Allows to set it to the given value, too.

Usage:
    # php cfg.php [--component=<componentname>] [--json] [--shell-arg]
    # php cfg.php --name=<configname> [--component=<componentname>] [--shell-arg] [--no-eol]
    # php cfg.php --name=<configname> [--component=<componentname>] --set=<value>
    # php cfg.php --name=<configname> [--component=<componentname>] --unset
    # php cfg.php [--help|-h]

Options:
    -h --help                   Print this help.
    --component=<frankenstyle>  Name of the component the variable is part of. Defaults to core.
    --name=<configname>         Name of the configuration variable to get/set. If missing, print all
                                configuration variables of the given component.
    --set=<value>               Set the given variable to this value.
    --unset                     Unset the given variable.
    --shell-arg                 Escape output values so that they can be directly used as shell script arguments.
    --json                      Encode output list of values using JSON notation.
    --no-eol                    Do not include the trailing new line character when printing the value.
Here are a few good examples of how to use it.
For a site configuration value e.g. the list of user ids who are site administrators.
php admin/cli/cfg.php --name=siteadmins
2
To search for a configuration value that you think might be set use good old grep:
php admin/cli/cfg.php | grep wwwroot
wwwroot	https://{yoursite.com}
For any component/plugin use the {type}_{name} format i.e. frankenstyle like tool_log or enrol_manual:
php admin/cli/cfg.php --component=tool_log
enabled_stores	logstore_standard
exportlog	1
version	2018120300

php admin/cli/cfg.php --component=enrol_manual
defaultenrol	1
enrolperiod	0
enrolstart	4
expiredaction	1
expirynotify	0
expirynotifyhour	6
expirythreshold	86400
roleid	5
status	0
version	2018120300
You can also output json if you like (though you need to format json accordingly).
php admin/cli/cfg.php --component=enrol_meta --json | python -m json.tool
{
    "coursesort": "sortorder",
    "nosyncroleids": "",
    "syncall": "1",
    "unenrolaction": "3",
    "version": "2018120300"
}
The set and unset options are particularly handy if you the site is not working due to a configuration option For example lets just set the auth methods available to email and remove saml2 and a2fa.
php admin/cli/cfg.php --name=auth
email,saml2,a2fa

php admin/cli/cfg.php --name=auth --set=email
php admin/cli/cfg.php --name=auth
email
Useful URL Shortcuts
Sometimes rather than navigating, it is easier to type in the relevant URLs, particularly if you have these set up with a text auto-completion tool. Also helpful if you can't get to say the site administration block because it has been hidden away.
In all examples, these go after your base URL e.g. /admin means https://{yourmoodle.com}/admin.
| Path | Description |
|---|---|
/admin/environment.php |
Environment page |
/admin/phpinfo.php |
PHP information |
/admin/plugins.php |
Plugins overview page |
/admin/search.php |
Search page for any site configuration option |
/admin/settings.php?section=debugging |
Developer debug settings |
/admin/roles/admins.php |
Site administrators |
/admin/user.php |
User management |
/course/search.php |
Search for a course by its name |
/user/index.php?id=1&search=fred |
Search for user with name fred |
/user/index.php?id=1&search=Fred%20Jones |
Search for user with name Fred Jones (%20 represents a space) |
/user/editadvanced.php?id=-1 |
Create a new user |
/user/editadvanced.php?id=2 |
Edit an existing user if you know their internal moodle id |
/user/profile.php?id=2 |
View the profile of an existing user if you know their internal moodle id |
Hide My Profile Forum Posts
For all users:
- Set the configuration value
navadduserpostslinks - You can either update the value of this in the database (
mdl_config) from1to0OR you can add an entry inconfig.phpwhere you set$CFG->navadduserpostslinks = 0;. Alternatively you can use the Site Configuration CLI tool - Clear you moodle cache
Time Zones
Moodle time zone information in the first instance is loaded from:
https://download.moodle.org/timezone/
This returns a text file which is stored in the lib directory as timezone.txt
The data is stored in the table mdl_timezone.
Hide My Profile Messages
For all users:
- This is set by the configuration value
messaging - You can either update the value of this in the database (
mdl_config) from1to0OR you can add an entry inconfig.phpwhere you set$CFG->messaging = 0;. Alternatively you can use the Site Configuration CLI tool - Clear the moodle cache
Showing additional fields on user profile page
The fields displayed on the user profile page (public profile) are controlled by the code in lib/myprofilelib.php. You'll find there is logic in there that checks for certain configuration settings.
For example, if you wanted to show the phone number (phone1), mobile phone (phone2) and id number fields (idnumber), there is a setting under the function core_myprofile_navigation that determines which contact details to show using the data in the configuration variable $CFG->showuseridentity.
This can be set in the site administration area under:
You could also set the value of this in config file as $CFG->showuseridentity as a string of comma separate values e.g.
$CFG->showuseridentity = 'phone1,phone2,idnumber';
Sometimes these settings are hard to find the Site administration user interface, until you have a look in the code and then search for the relevant configuration item like showuseridentity.
Add Site Admins through cfg.php tool
You can use the site configuration admin/cli/cfg.php tool to add a site admin if you know the user's Moodle user id.
Here's a quick example
php admin/cli/cfg.php | grep siteadmins
siteadmins	2,669,2104,3328,4350
This gives us the user ids that are currently siteadmins (e.g id 2 is the admin user).
Now lets add the user id, 5000 to this list, making sure that we retain the the other ids (otherwise they will lose site admin!).
php admin/cli/cfg.php --name=siteadmins --set=2,669,2104,3328,4350,5000
Then verify the list again:
php admin/cli/cfg.php | grep siteadmins
siteadmins	2,669,2104,3328,4350,5000
Search Engine Indexing
There are two settings in your Moodle related to search engine indexing of the site. These can be found under:
The first setting is Open to Google opentogoogle which determines if google can enter your site as a guest and allow people who find your site to be logged in as guest. This only applies to content that is already open to guest users. This is always disabled by default.
Just be aware that if you do enable this and you have log guest users enabled you may fill up your moodle logs pretty quickly if you have a lot of traffic from search engines.
The second setting available on newer moodle versions is Allow indexing by search engines allowindexing which allows you to select what level of indexing by search engines is allowed by setting a tag. To disable all indexing use Nowhere.
You can of course also fine tune access using a robots.txt if required, just be aware that this is not something that is included by default.
Uninstall Missing Plugins
The Site administration > Plugins > Plugins overview page is a really important section to check after any Moodle upgrades. This will list all the plugins on the site, as well as plugins that are Missing from disk which means they have been removed from the code tree but there still orphan configuration in the database (mdl_config_plugins) for that plugin.
Ideally this should be cleaned up to avoid errors with missing plugin functionality. However, in the past it was quite tedious as you had to go through and open each Uninstall plugin link in a new browser tab and run through them all.
However, Moodle have now included an uninstall_missing_plugins.php CLI script that allows you to remove plugins in bulk (yay).
First to see what's missing:
php admin/cli/uninstall_plugins.php --show-missing
Then to try a dry run of purging:
php admin/cli/uninstall_plugins.php --purge-missing
If that looks ok, go ahead and run it with:
php admin/cli/uninstall_plugins.php --purge-missing --run
There will be scenarios where the utility (or the plugins overview page) can't remove the plugin in which case you'll need to do some database surgery starting at the mdl_config_plugins table looking for the plugin by type e.g. theme_essential.
Just a note if you do delete anything out of the mdl_config_plugins table don't forget to purge your Moodle cache completely before checking (as it may look like it didn't work, even with this CLI script).
HTTPS Conversion Tool
The latest versions of Moodle include a HTTPS conversion which helps you search for and change over any external links in the database to https.
To access it:
At the bottom you should see a link to the HTTPS conversion tool if you are on a recent version of Moodle.
The direct link is:/admin/tool/httpsreplace/index.php
It will first run scan over the database and then advise of any URLs that require changing from http to https and allow you to perform an update.
Very handy especially if you are getting reports of mixed content warnings from the browser.
Mailtrap.io SMTP settings
Here are the settings to use in Mailtrap.io if you want to capture all emails sent from Moodle to a sandbox area (e.g. in test and development environments):
$CFG->smtphosts = 'smtp.mailtrap.io:2525';
$CFG->smtpsecure = 'tls';
$CFG->smtpuser = '<username>';
$CFG->smtppass = '<password>';
You can also change these in under Site administration > Server > Email > Outgoing mail configuration.
To find your Mailtrap.io username and password visit your inbox, edit the settings (settings cog) and show your credentials.